Our View on View Models
How to keep your view controllers focused
Over the past few years, the Model-View-ViewModel (MVVM) design pattern has become popular in iOS application architecture, battling the massive view controller problem that traditional Model-View-Controller (MVC) architecture left us with. Aided by a fourth component, the view model, MVVM offers a means of breaking some presentation logic out of controllers.
View models and their many definitions can leave developers new to the topic scratching their heads. It’s also possible to shift too much responsibility to view models in an effort to make view controllers lighter. We don’t strictly follow MVVM at Lickability, but we do make extensive use of view models, and we think it’s worth sharing exactly how. We’ll explore our approach to using view models, what they are and aren’t in our codebases, and why we find them delightful to work with in iOS and Swift.
View Model: A Simple Definition
We broadly define “view model” as a type that encapsulates the data needed to populate a particular kind of view. More succinctly, a view model is a view’s model. These basic definitions leave something to be desired. Do our view models merely store data and remain void of any operations? No — we allow them to perform operations strictly in the aid of displaying data, so let’s expand this definition to a type that encapsulates the data needed to populate a particular kind of view and the presentation logic needed to transform the data into properties that can be rendered. Okay, but what qualifies as “presentation logic,” and what does “transform” mean in this context? 😵
View Model: A Concrete Example
Let’s start over, and discuss view models in terms of UIKit and iOS application architecture with an example. Ultimately, we’re going to build a cell that can display a comment about a blog post for an interface that looks like this:
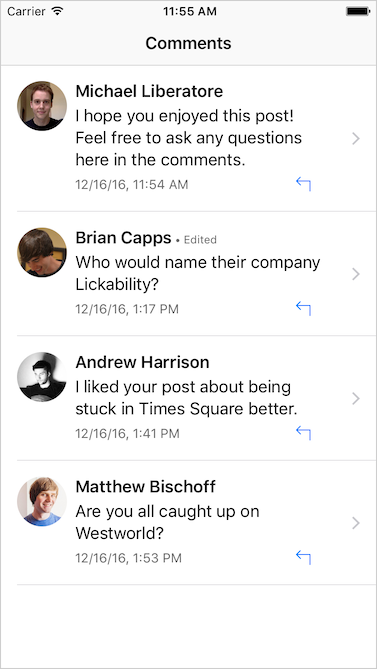
The completed interface with comment cells backed by view models
We’ll start with a view. Specifically a UITableViewCell, which is a UIView subclass. A UIView defines a rectangle of content and contains some smarts about user input that we’ll deal with later. But hey, that’s visual! What’s it look like?

An empty view in Interface Builder
Great, we’ve got a view. Our cell is empty and rendered with its default backgroundColor. We haven’t provided it with any data yet, nor have we exposed any means to give it data. Let’s step up our game and fill the view with UI components. To keep our code snippets focused on the topic at hand, we’ll leave the layout to Interface Builder, but you’re free to set up and lay out the view however you’d like. Here’s the final layout of our cell:
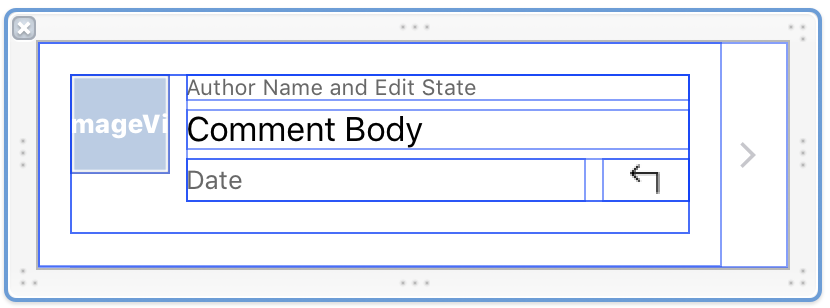
A designed UITableViewCell in Interface Builder representing a comment posted on a blog
Awesome, we’ve got some content! Or… placeholders for content. We’ll need to get the data from the model layer of our application into copies of this cell to display on screen. Before our view model will make sense, we need to define that layer of the application.
The Model
Let’s look at a simple model type, which mirrors an object returned from a web service. Assume the application has a use for all of this stuff, despite the cell in our example requiring only a subset.
For good measure, here’s the CommentAuthor type referenced in Comment above.
Look at all that data! In a real application, there may be even more, like the number of “likes,” more author information, and perhaps storage for multimedia included in a comment. But even so, our cell only needs a subset of this data:
- The author’s name
- The date the comment was posted
- The text of the comment
- Whether the user has edited the comment’s text since posting it
Although using a value type to model a Comment would save us from our view being able to manipulate any aspect of the application’s model layer, we’re still going to provide the view with only the data it needs. Specifically, our cell subclass will not know about the Comment type. We can accomplish this in a number of different ways including:
- Exposing the UI components on our cell subclass to be populated with the data from the model
- Keeping the UI components private and exposing individual properties for each piece of data that will populate the UI components when set
- Expose a single point of configuration: a view model
Guess which one I’m going to pick.
The first option would greatly increase the surface area of our cell’s API. This could lead to heavy configuration being done at the view controller layer, even spreading or duplicating across multiple view controllers if we chose to use this cell in more than one context. We’d expose the ability to fill the labels with any text, modify any stylistic attributes, and easily manipulate layout. No thanks.
The second option, exposing multiple properties, is better but still not great. We wouldn’t run into any major issues with this approach in our simple example. But, more complex views that expose many configuration properties need to concern themselves with the order in which properties are set and whether some or all have values. This can also lead to multiple layout and drawing passes as each property is configured separately instead of a single pass after configuration.
The way we use view models aims to solve the problems of the first two approaches. The view only needs to know about the data it displays, and the view exposes a single property, the view model, such that layout and drawing can always happen predictably and completely. So what might this look like?
The View and View Model
We usually tie a view model type directly to a view type by nesting it. This covers most of our use cases and makes naming trivial thanks to namespacing. Let’s take a look at a snippet of our CommentCell that backs the view we designed earlier.
We’ve declared two types: CommentCell which is our UITableViewCell subclass, and CommentCell.ViewModel, the view model that backs this cell type. So far, we have one property declared on CommentCell, which is an instance of CommentCell.ViewModel. This will ultimately become the single point of configuration.
Notice that in the view model type, most of the properties can easily be mapped from our model later. We don’t want the view controller layer to take on the responsibility of determining how to format and display an author’s name. We’re also packing the author’s name into the same label as the “Edited” demarcation so that it could wrap naturally. This layout is specific to our cell type, and we want to house that logic in our view model. This is an example of presentation logic, which we alluded to earlier. Similarly, the view controller shouldn’t be responsible for determining how to format the date displayed in our view. Rather, we leave that presentation logic to our view model. We’ll put this presentation logic in an extension on the view model type to separate it from its purely model-like properties.
Burying this presentation logic deep inside of aUIViewController subclass would make it more difficult to test. We tend to leave these computed properties exposed in our view models so that they may be more easily accessed in our test target, without the need to instantiate any UIViewControllers or UIViews.
With the context provided by this example, defining a view model as “a view’s model” begins to make more sense. We store only the properties we need to fill our view with data and we provide operations needed to transform that data into something presentable. Let’s put it to use.
A Single Point of Configuration
So far we’ve only defined a single property on our cell subclass.
var viewModel: ViewModel? However, we’re not making use of this just yet. Since we’re using this property as our single point of configuration for all displayable data, we’ll want changes to this property to update our view. We make use of the computed properties that contain our presentation logic as follows.
We define a single means of configuring our view. This makes configuration safer since it becomes impossible to only specify a subset of exposed properties, relying only on prepareForReuse() to reset properties that can be left unset. Rather, we force our controller to set them all at once. Our example cell is relatively simple, but in more complex cases, the order in which UI components are updated may matter more, and by exposing only one property we can ensure the order of updates is consistent and predictable.
Our UITableViewDataSource implementation will be relatively simple with this approach. It’s straightforward for us to translate to the view model type provided our actual model at this layer.
We’ve plucked a few properties from our model object, and that’s pretty much it. Our view models only hold onto the data they need to fill out the UI components. They also specify a means of translating that data into something to present on screen, as we did in our CommentCell.ViewModel extension.
If you’re following closely, you’ll notice that our view model specifies its authorImage as a UIImage?, not a URL, so translation from our actual model layer for that particular property doesn’t come quite as easily. You’ll notice that in the snippet above, we’re simply passing nil for authorImage. 🤔 Also, what happens when you tap that reply button on the cell? Well, nothing yet.
View models are not a silver bullet against massive view controllers!
We’ve housed presentation logic in a location that’s far away from a view controller. However, we’ve kept the responsibilities of our view model simple and well-defined.
Let’s talk about the elephant in the blog post. Where are those comment author images coming from?
Retrieving Data
Our view model has a UIImage? property, not a URL. We do this because we do not want our view model to be responsible for downloading images. A view model is a view’s model (remember?), and you wouldn’t put networking code in your traditional model layer, would you? Would you?
(Okay, maybe you did in that one project early in your career, but it eventually bit you, right? And you really hope no one ever sees that model object that retrieves its data from the network on the main thread, parses it, and persists it, right?)
So why would our view model be responsible for retrieving images from the network? Or from disk? We don’t believe that it should.
In our example, we passed nil for the authorImage parameter of our view model’s initializer with the expectation that something would come along and set the image once its retrieved from the networking or persistence layer. That’s right, we treat networking and persistence as layers separate from our model, view, view controller, and view model layers. We won’t dive too deeply into this concept as it deserves a blog post of its own, but suffice it to say we inject our view controllers with network and persistence-related dependencies that handle this for us. The important takeaway is that these are not the responsibilities of a view or view model — we’ve seen this architectural mistake all too often. There are other ways of moving this type of work out of view controllers!
So instead of setting our authorImage to nil, we could have our UITableViewDataSource ask the persistence layer of our application to retrieve an image for a particular URL. This would change our configuration from above to something like the following.
The method image(for:) in this example would return an optional UIImage since there’s no guarantee that we’d actually have that image yet. We’d defer downloading of the image, prioritizing display of the data that we already have. We could kick off the downloading of images in tableView(\_:willDisplay:forRowAt:) for the cases in which we don’t have them on disk, or perhaps when our local cache has expired and we want to update an existing image already stored on disk. Once we have this image, say, in the completion handler of a network request method, we can simply set it on the cell’s view model as follows.
cell.viewModel?.authorImage = imageFromNetwork Now you might notice that we’ve actually left the authorImage property on CommentCell.ViewModel a var as opposed to a let. This is great because it allows us to change the value of a displayable property that we expect to change, but setting it still triggers our viewModel property’s didSet relieving us from any concerns about the order in which UI components are configured. Despite the fact that we’re updating a single property, we still hit our single point of configuration. (Should I create a TextExpander snippet for that phrase?)
To belabor the point, our view models do not touch the networking layer and do not touch the persistence layer of our application.
Delegating Action
Typically, the handling of tapping a cell can be performed by either a storyboard segue or in the UITableViewDelegate method tableView(\_:didSelectRowAt:), commonly implemented by the UIViewController or type that is used by the UIViewController. But notice that in addition to being able to tap the cell, we’ve also got a reply button.

So, does the view model take part in this interaction? No. We like to follow the same pattern as cell selection, in that it can done via a storyboard segue if we’ve specified our layout in prototype cells in a storyboard, or by allowing the UIViewController to handle the interaction. We do not want the view model or view to own any of this responsibility. Let’s walk through the non-storyboard approach.
First, we need to prepare our cell class to be able to intercept the button tap. We’re not going to carry out the button’s action, but rather provide a means for our view controller to do so. We declare a closure to be set externally on our cell and a corresponding action method.
Whether you use an @IBAction or register a target/action using addTarget(\_:action:for:), you’ll simply have to call the closure when the button is tapped.
All we have left to carry out the action of tapping a CommentCell’s reply button is to set the replyButtonTapHandler. We do this in the same location that we configured the viewModel property discussed earlier.
So, the single point of configuration is for all display-related data. We separate actions into their own properties, as it’s not the view model’s responsibility to carry out the handling of user input. These actions could also be handled via delegation, but we prefer closure properties for this type of interaction.
Be a (View) Model Citizen
Looking back at our simplest definition — a view model is a view’s model — the example we’ve illustrated matches this. It also helps to draw very clear barriers about what a view model is not. With this knowledge, we can lighten some of the load on our view controllers while preventing our view models from taking on too much responsibility.
For more on view models, our friends Chris Dzombak and Soroush Khanlou spent episodes 2 and 3 of their podcast Fatal Error on the topic, which include quality coverage of the problems they can solve, the MVVM design pattern as it relates to iOS development, pitfalls, and more. Check out the show notes for these episodes which include links to many more relevant resources. See also Andy Matuschak’s 2015 NSSpain talk Let’s Play: Refactor the Mega-Controller.
What’s Next?
Of course, there’s still more to cover. The approach that we outlined here doesn’t apply to views that are reusable in different scenarios. Our example included a cell for a blog post comment, specifically, but it’s certainly possible that an app would have much simpler cells that could be reused in multiple contexts. In these circumstances, we make use of view model protocols to share common layout behavior for views with varying purposes. We’ll explore this approach in our next post on view models. Stay tuned!