Automating App Store Screenshots
Using Fastlane and SwiftUI
Why are screenshots important?
You’re probably here because you might be shipping to the App Store soon or are coming close to App Store submission. 🚀 Truly an exciting part of the app creation process! One very important part of the App Store submission process is taking screenshots of key features in your app. Screenshots help potential users visualize what functionality to expect when downloading your app for the first time. Taking screenshots can also be a very time consuming part of the process—luckily there is a nifty tool from Fastlane to help automate this process called snapshot.
Getting started with Fastlane
You’ll need to have Xcode command line tools installed, but in case you don’t, entering this command via Terminal should do it:
xcode-select --install Fastlane can be installed through multiple clients including Homebrew:
fastlane can be installed multiple ways. The preferred method is with Bundler.
Fastlane's setup documentation
These are the instructions from the documentation:
- Install Bundler by running
gem install bundler - Create a
./Gemfilein the root directory of your project with the content
source "https://rubygems.org"
gem "fastlane"
Setting up Fastlane snapshots
Running this command will generate the Swift SnapshotHelper and Snapfile necessary for configuring metadata related to your screenshots:
fastlane snapshot init The generated Snapfile will look similar to this:
You’ll have to change the SchemeName to the project test target name. For reference we’ll also drag the SnapshotHelper Swift file to the UI test target folder, although it can remain anywhere in the project directory.
If you’re curious about which APIs are used for the snapshots, you can read more about how XCUIScreenshot is used for generating screenshots. The SnapshotHelper also helps scale the snapshots based on device orientation and size using UIGraphicsImageRendererFormat.
Based on the platforms your app supports, the device list can expand or decrease. For now we’ll choose iPhone 12 Pro Max, iPhone SE (2nd generation), iPad Pro (12.9-inch) (4th generation) to generate the snapshots in the Snapfile.
You can also also download additional simulators or change the device list to match the simulators available. Otherwise Fastlane will produce an error when attempting to set those values.
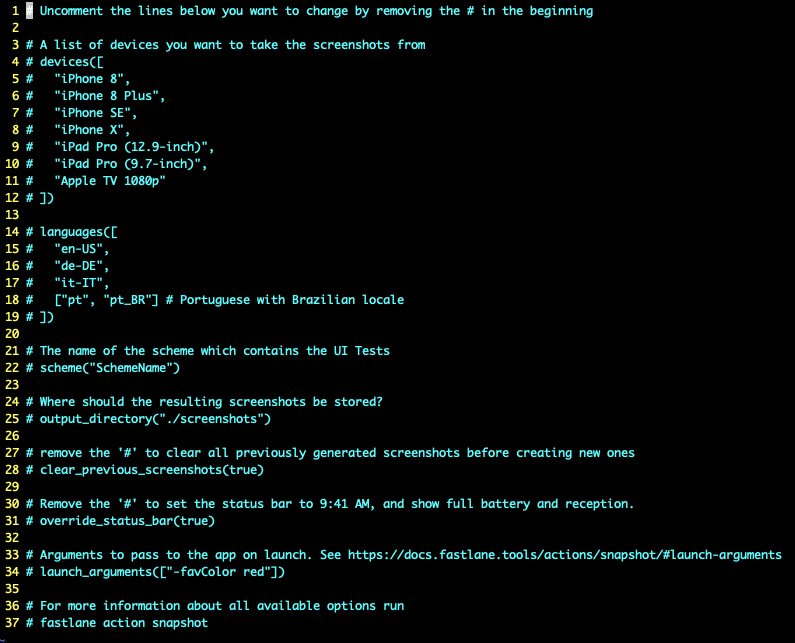
For simplicity we’ll set up the Snapfile like this:
# Uncomment the lines below you want to change by removing the # in the beginning

# A list of devices you want to take the screenshots from
 devices([
   "iPhone 12 Pro Max",
   "iPhone SE (2nd generation)",
   "iPad Pro (12.9-inch) (4th generation)"
 ])

 languages([
   "en-US"
 ])

# The name of the scheme which contains the UI Tests
 scheme("FastlaneSnapshotsUITests")

# Where should the resulting screenshots be stored?
 output_directory("./screenshots")

# remove the '#' to clear all previously generated screenshots before creating new ones
 clear_previous_screenshots(true)

# Remove the '#' to set the status bar to 9:41 AM, and show full battery and reception.
 override_status_bar(true)
Setting up Xcode
We made an Xcode project with all of the examples shown in this post. You can find it right here.
An important part of the Fastlane automation tool for snapshots is setting the UI test target to build and run like this:
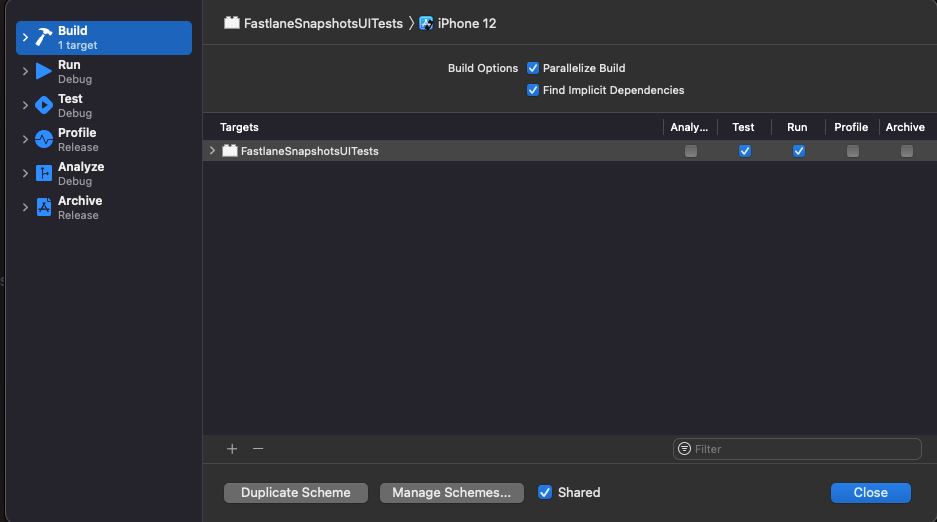
Configuring the UI test
Next, we’ll need to set up the UI test code with an XCUIApplication instance along with a helper function from the SnapshotHelper like this:
private var app: XCUIApplication!

override func setUp() {
    super.setUp()
    continueAfterFailure = false
    app = XCUIApplication()
    setupSnapshot(app)
    app.launch()
}
One thing to note here is that UI tests can be time consuming depending on the complexity and architecture of your app. In order to create meaningful App Store screenshots, you’ll need some variation of mock data. When building Scorecard we found launch arguments super useful to help differentiate the UI test at app launch. Then you can simply add an extension like this to detect the launch argument:
extension UIApplication {

    /// Checks the command line arguments for the current process to see if a UI test is running.
    public static var isUITest: Bool {
        return CommandLine.arguments.contains("-UITests")
    }
}
For simplicity, the demo project contains a SwiftUI List, avatar image, stepper, and label for the stepper count. I’ve also included a navigation item to display a text field alert to change the title of the list. The SnapshotHelper we covered earlier contains this function that takes the screenshot and append a name to each one:
/// - Parameters:
///   - name: The name of the snapshot
///   - timeout: Amount of seconds to wait until the network loading indicator disappears. Pass `0` if you don't want to wait.
func snapshot(_ name: String, timeWaitingForIdle timeout: TimeInterval = 20) {
    Snapshot.snapshot(name, timeWaitingForIdle: timeout)
}
The UI test code will then look something like this:
func testTakeSnapshots() {
    snapshot("1-GameView")

    let coordinate = app.tables.otherElements.firstMatch.coordinate(withNormalizedOffset: CGVector(dx: 0.9, dy: 0.5))

    for _ in 0...5 {
        coordinate.tap()
    }
    snapshot("2-StepperIncremented")
    app.navigationBars.firstMatch.buttons.firstMatch.tap()
    app.textFields.firstMatch.tap()
    snapshot("3-Alert")
    app.textFields.buttons["Clear text"].tapElement()
    app.typeText("Taboo")
    app.buttons["Dismiss"].tap()
    snapshot("4-GameChanged")
}
Generating the snapshots
After confirming that this builds and tests succeed for each device in the Snapfile list, we’ll run:
bundle exec fastlane snapshot --verbose The --verbose flag is great for identifying build or test failures. This might also take a few minutes. ⏳
Once the snapshots are generated you’ll see a nice results table indicating success or failure.
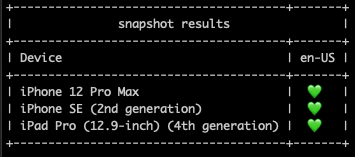
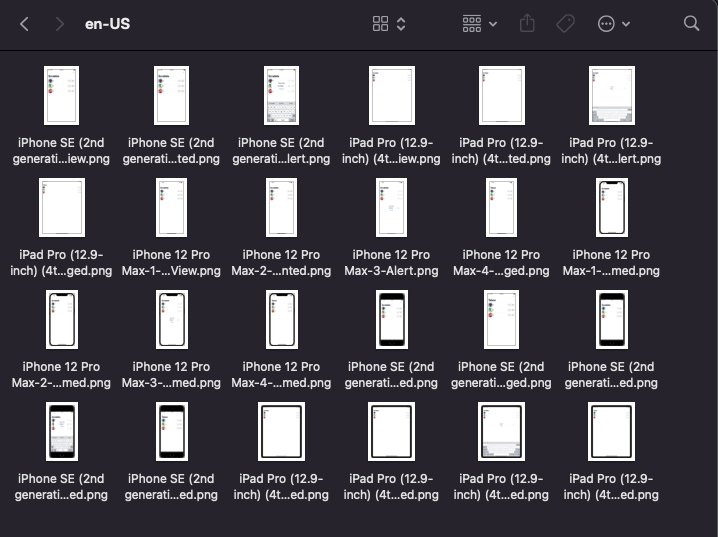
You’ll also see a local html file with the snapshots in the /screenshots directory.
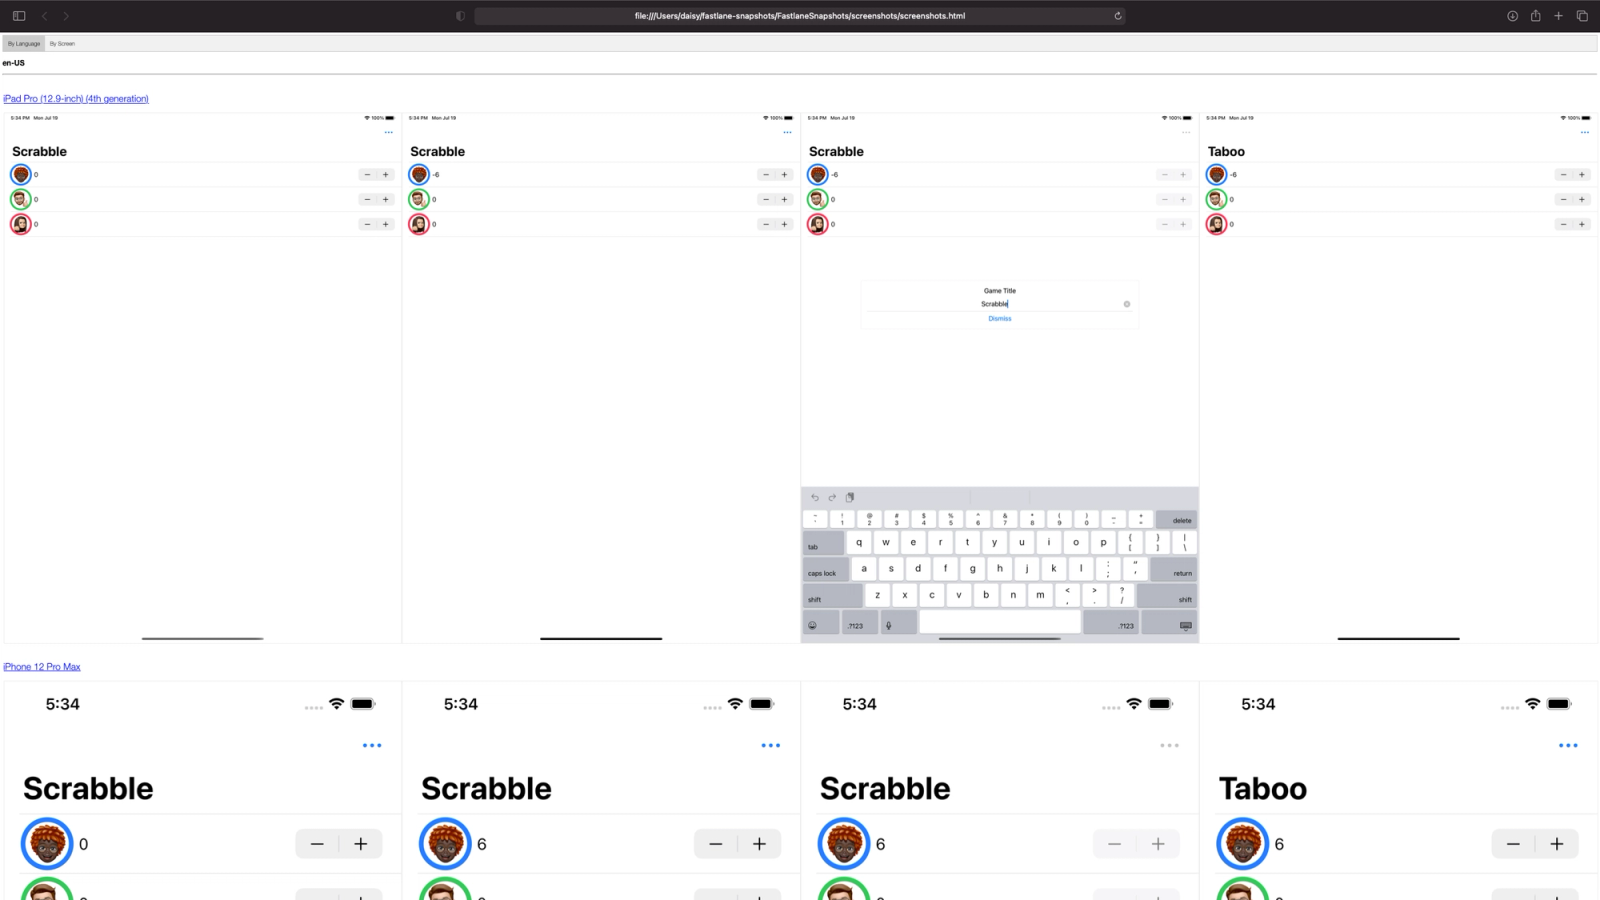
These look fine but they’re unframed. Luckily Fastlane has another nifty command line tool to frame these screenshots into iOS device frames called frameit.
Using Frameit
You’ll need to download the frames first:
bundle exec fastlane frameit download_frames Then:
bundle exec fastlane frameit After that runs, navigate to the screenshots directory and you can see that those framed screenshots were added separately.
From Fastlane’s advanced frameit usage documentation:
With frameit it's possible to add a custom background and text below or above the framed screenshots in fonts and colors you define.
Fastlane
To make this possible we need to create a json file named Framefile with the following structure:
{
  "device_frame_version": "latest",
  "default": {
    "title": {
      "font": "./Fonts/SF-Pro-Rounded-Bold.otf",
      "color": "#FFFFFF"
    },
    "padding": 50,
    "show_complete_frame": false,
    "stack_title": false,
    "use_platform": "IOS"
  },
  "data": [
    {
      "filter": "1-GameView",
      "background": "./red.png"
    },
    {
      "filter": "2-StepperIncremented",
      "background": "./blue.png"
    },
    {
      "filter": "3-Alert",
      "background": "./yellow.png"
    },
    {
      "filter": "4-GameChanged",
      "background": "./green.png"
    }
  ]
}
In the docs, the general parameters are listed with a description indicating if it’s optional or mandatory. The background key is mandatory and must be an image file, e.g. png, jpg. I’ve included some sample colors in the screenshots folder along with a custom font.
Notice how the filter key includes the named screenshots from the UI test. We’ll use that key to associate it with a title in a title.strings file like this:
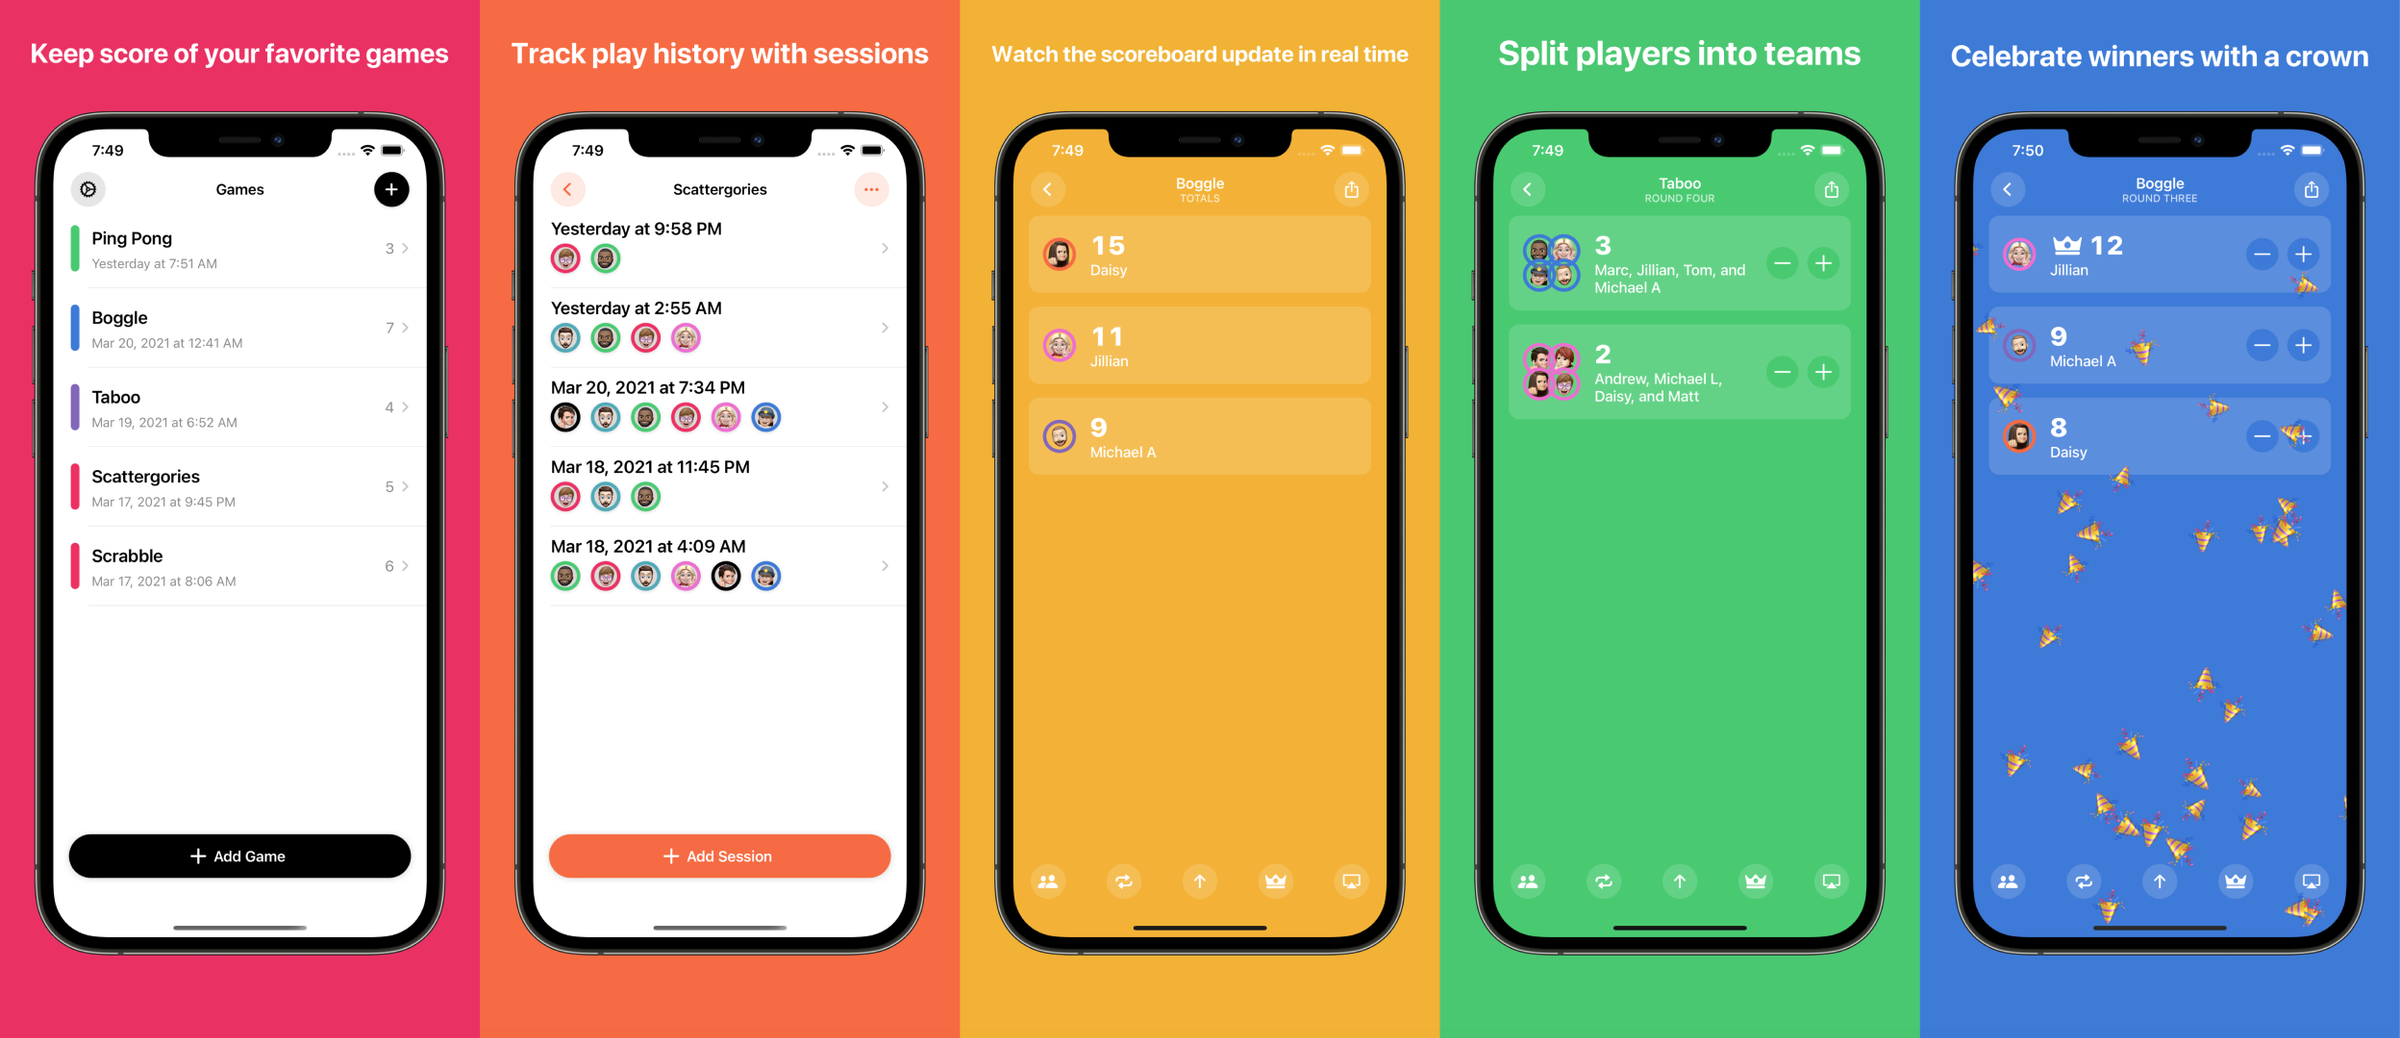
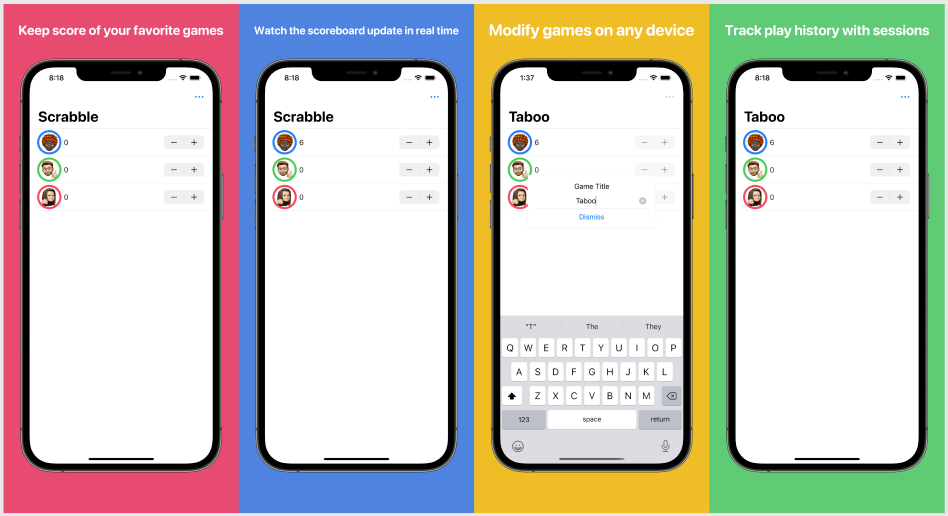
"GameView" = "Keep score of your favorite games";
"StepperIncremented" = "Watch the scoreboard update in real time";
"Alert" = "Modify games on any device";
"GameChanged" = "Track play history with sessions";
Then run:
bundle exec fastlane frameit The result: framed screenshots with the parameters we defined!
Conclusion
Fastlane’s snapshot and frameit automation tools are incredibly useful for App Store screenshots and App Previews. It’s easily integratabtle through the command line and Xcode. This setup and configuration can be adopted into new or existing Xcode projects. Like many software tools, these can also be improved. For instance, the titles can only be one color—it would be nice if there was some attributed support for highlighting specific text. Having the background colors as image files work well, but having extended configurations for hex or RGB strings would be more customizable. Nonetheless, we’re fans of the Fastlane tool suite and hope this post helps in your app submission process!